Yogurt Peanut Butter Brownie Cups: Easy No-Bake Recipe
What if the fudgiest dessert in your recipe box never had to touch an oven at all? These yogurt peanut butter brownie cups prove that rich, chocolatey satisfaction and creamy, protein-packed indulgence can come together in under thirty minutes, no baking required. Layering a dense brownie base with a swirl of tangy yogurt and glossy peanut butter, this no-bake dessert delivers bakery-style flavor with a fraction of the effort. Whether you need a quick treat for guests or a make-ahead stash for busy weeknights, this recipe fits effortlessly into any schedule. Best of all, it comes together with pantry staples and a short chilling window, so you can go from craving to first bite without ever preheating an oven.
Table of Contents
Ingredients
For this yogurt peanut butter brownie cups recipe, you will need:
- 1 and 1/2 cups chocolate cookie crumbs (for the brownie base)
- 1/3 cup unsalted butter, melted
- 1 cup Greek yogurt, full-fat for the creamiest texture
- 1/2 cup natural peanut butter, smooth and creamy
- 1/3 cup honey or maple syrup
- 1 teaspoon pure vanilla extract
- 1/2 cup dark chocolate chips, melted (for drizzling)
- A pinch of flaky sea salt (to finish)
Timing
This yogurt peanut butter brownie cups recipe requires:
- Preparation time: 20 minutes
- Chilling time: 2 hours
- Total time: approximately 2 hours 20 minutes
Step-by-Step Instructions
Step 1: Build the No-Bake Brownie Base
Line a muffin tin with paper liners or lightly grease a mini cheesecake pan. In a medium bowl, stir together the chocolate cookie crumbs and melted butter until the mixture resembles wet sand. Press about a tablespoon of the mixture firmly into the bottom of each cup, using the back of a spoon to compact it evenly. A tightly packed base is the secret to brownie cups that hold their shape once sliced.
Step 2: Whip the Yogurt Peanut Butter Layer
In a separate bowl, whisk together the Greek yogurt, peanut butter, honey, and vanilla extract until completely smooth and glossy. The mixture should be thick enough to hold a swirl but still soft enough to spoon easily. If it feels too thin, chill it in the refrigerator for 10 minutes before assembling; this small step keeps your layers distinct rather than blending into a muddy mess.
Step 3: Layer and Chill
Spoon the yogurt peanut butter mixture generously over each brownie base, smoothing the tops with an offset spatula or the back of a spoon. Transfer the tray to the refrigerator and chill for at least 2 hours, or until the tops are firm to the touch. Patience during this stage is what gives each cup its clean, sliceable structure.
Step 4: Drizzle and Finish
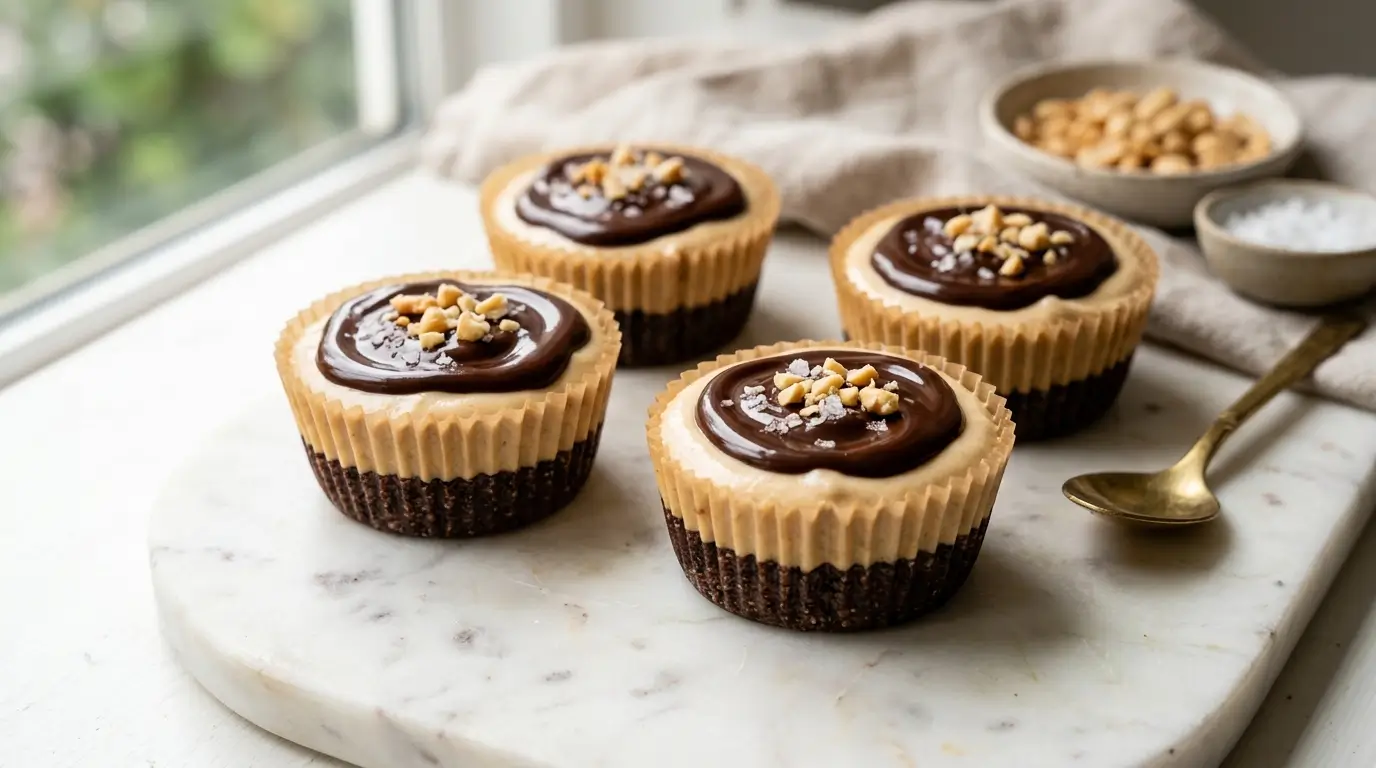
Once fully chilled, melt the dark chocolate chips in 20-second bursts in the microwave, stirring between each interval until silky smooth. Drizzle generously over the top of each cup, then finish with a light pinch of flaky sea salt for a sweet-and-salty contrast. Return the tray to the fridge for another 10 minutes to let the chocolate set before serving. At this point, your yogurt peanut butter brownie cups are ready to unmold, slice, and enjoy straight from the fridge.
Nutritional Information
For a serving of this yogurt peanut butter brownie cups recipe (1 cup, based on 12 servings):
- Calories: 190 kcal
- Total Fat: 11g
- Saturated Fat: 4g
- Cholesterol: 10mg
- Sodium: 95mg
- Total Carbohydrates: 18g
- Dietary Fiber: 2g
- Total Sugars: 12g
- Protein: 6g
- Calcium: 45mg
- Iron: 1mg
Compared to a traditional baked brownie, this lighter no-bake dessert offers noticeably more protein per serving thanks to the Greek yogurt and peanut butter base, while still satisfying a serious chocolate craving. It’s a balance of indulgence and nutrition that fits comfortably into a mindful dessert rotation.
Healthier Alternatives for the Recipe
Transform your yogurt peanut butter brownie cups into a healthier version with these modifications:
- Reduce the Sweetener: Cut the honey or maple syrup down to 3 tablespoons for a less sweet, more yogurt-forward flavor profile.
- Go Dairy-Free: Swap the Greek yogurt for a thick coconut or almond-based yogurt alternative to keep the recipe fully plant-based.
- Use a Nut-Free Butter: Replace peanut butter with sunflower seed butter for a school-safe, allergy-friendly version with the same creamy texture.
- Boost the Protein: Stir a scoop of vanilla protein powder into the yogurt layer for an extra nutritional boost without changing the flavor.
- Lower-Sugar Base: Use crushed graham crackers instead of chocolate cookie crumbs for a lighter, less sugary foundation.
- Dark Chocolate Upgrade: Choose 70% or higher dark chocolate for the drizzle to reduce sugar while deepening the chocolate flavor.
Serving Suggestions
Elevate your yogurt peanut butter brownie cups experience with these ideas:
- Top each cup with a few crushed peanuts or chopped roasted almonds for added crunch and visual appeal.
- Serve alongside fresh raspberries or sliced strawberries to add a bright, tart contrast to the rich layers.
- Pair with a small espresso or cold brew for an afternoon pick-me-up that feels indulgent yet balanced.
- Arrange the cups on a tiered dessert stand for parties, garnished with a light dusting of cocoa powder.
- Add a small dollop of whipped cream just before serving for an extra layer of lightness.
- Pack a couple of cups in an insulated container for a satisfying on-the-go treat or lunchbox surprise.
- Present these yogurt peanut butter brownie cups on a rustic wooden board for a relaxed, shareable dessert spread at gatherings.
Common Mistakes to Avoid
Master this yogurt peanut butter brownie cups recipe by avoiding these pitfalls:
- Skipping the Chill Time: Cutting the chilling time short leaves the layers too soft to hold their shape, resulting in a messy, sliding dessert.
- Using Low-Fat Yogurt: Low-fat or watery yogurt can make the top layer runny; full-fat Greek yogurt gives the sturdiest, creamiest result.
- Overheating the Chocolate: Melting chocolate too quickly or at too high a temperature can cause it to seize; always melt in short bursts, stirring often.
- Under-Packing the Base: A loosely packed cookie base tends to crumble apart when the cups are removed from the liners; press firmly and evenly.
- Rushing the Layering: Adding the yogurt mixture while it’s too warm causes it to melt into the base instead of sitting distinctly on top.
- Ignoring the Salt Finish: Skipping the flaky sea salt at the end mutes the flavor contrast that makes this dessert so memorable.
- Slicing Too Soon: Cutting into your yogurt peanut butter brownie cups before the chocolate drizzle fully sets can smear the topping and mess up the presentation.
Storing Tips for the Recipe
Preserve the freshness of your yogurt peanut butter brownie cups with these strategies:
- Refrigerator Storage: Store the cups in an airtight container in the refrigerator for up to 5 days without any loss of texture or flavor.
- Freezing for Later: Freeze individual cups in a freezer-safe container, separated by parchment paper, for up to 2 months.
- Thawing Properly: Thaw frozen cups in the refrigerator overnight for the best texture; avoid thawing at room temperature to prevent the yogurt layer from becoming watery.
- Make-Ahead Prep: Prepare the brownie bases up to 2 days in advance and store them covered at room temperature before adding the yogurt layer.
- Avoiding Sogginess: Keep the cups covered tightly to prevent the cookie base from absorbing excess moisture from the refrigerator.
- Labeling for Freshness: If storing multiple batches of yogurt peanut butter brownie cups, label containers with the prep date so you always know how long they have been chilling.
Conclusion
These yogurt peanut butter brownie cups deliver rich chocolate flavor, creamy tang, and effortless no-bake convenience in every bite. With simple ingredients and minimal hands-on time, this dessert is easy to master and even easier to love. Give it a try and share your results in the review section below.
FAQs
Can I make yogurt peanut butter brownie cups ahead of time? Yes, these cups can be fully assembled up to 2 days in advance and stored covered in the refrigerator until ready to serve.
Can I use crunchy peanut butter instead of smooth? Absolutely, crunchy peanut butter adds a pleasant texture contrast, though the layer will be slightly less smooth when spooned.
Do these yogurt peanut butter brownie cups need to be kept cold? Yes, because of the yogurt layer, these cups should stay refrigerated until just before serving to maintain their structure.
Can I make this recipe vegan? Yes, use a thick plant-based yogurt, a plant-based butter alternative for the base, and maple syrup instead of honey for a fully vegan version.
Why did my brownie base fall apart? This usually happens when the cookie crumb mixture isn’t pressed firmly enough; use the back of a spoon to compact it tightly before adding the yogurt layer.
How many yogurt peanut butter brownie cups does this recipe make? This recipe yields 12 standard-sized cups, making it perfect for parties, potlucks, or a week’s worth of no-bake dessert portions.
Your Feedback Matters
There are no reviews yet. Be the first one to write one.