Mac & Cheese Lunch Box: Easy Kid-Approved Recipe
What if the single most requested school lunch in America wasn’t a sandwich at all, but a warm, cheesy bowl of pasta tucked into a thermos? A well-packed mac & cheese lunch box challenges the old idea that portable meals have to be cold and boring, proving that a creamy, main-dish classic can travel just as well as it tastes fresh off the stove. Once you master the sauce ratio, the pasta doneness, and the right insulated container, packing this comforting main dish stops being a rushed morning chore and turns into a simple, repeatable routine that both kids and adults look forward to opening at noon.
Table of Contents
Ingredients
For this mac & cheese lunch box you’ll need the following ingredients:
- Elbow macaroni: 2 cups, cooked just shy of al dente so it holds up in the thermos
- Sharp cheddar cheese: 1 and 1/2 cups, freshly shredded for the smoothest melt
- Butter: 2 tablespoons, unsalted
- All-purpose flour: 2 tablespoons, to build the roux
- Whole milk: 1 and 1/2 cups, warmed slightly to prevent lumps
- Mustard powder: 1/4 teaspoon, for a subtle tang that wakes up the cheese
- Salt and black pepper: to taste
- Optional breadcrumb topping: 2 tablespoons, toasted, added just before packing for a bit of crunch
For the other lunch box compartments:
- Grapes, apple slices, or orange segments: a handful, for the fruit compartment
- Cucumber slices or baby carrots: a handful, for the veggie compartment
- Whole grain crackers: a small handful, optional, for extra crunch
Timing
This mac & cheese lunch box requires the following time investment:
- Preparation time: 10 minutes
- Cooking time: 15 minutes
- Assembling and packing time: 5 minutes
- Total time: approximately 30 minutes
Step-by-Step Instructions
Step 1: Cook the Pasta With Purpose
Bring a large pot of salted water to a rolling boil and cook the elbow macaroni one minute less than the package directs. Pasta continues to soften slightly as it sits in a thermos, so undercooking now is the trick that keeps your mac & cheese lunch box from turning mushy by lunchtime. Drain well, but skip the rinse — that starchy surface helps the cheese sauce cling.
Step 2: Build a Silky Roux
In the same pot, melt the butter over medium heat, then whisk in the flour and cook for about 60 seconds until it smells faintly nutty. This short cooking time removes the raw flour taste without darkening the roux, which matters because a pale roux keeps the sauce for your mac & cheese lunch box bright and appetizing rather than dull.
Step 3: Whisk in the Milk and Simmer
Slowly pour in the warmed milk while whisking constantly, breaking up any clumps as you go. Let the mixture simmer gently for 3 to 4 minutes until it coats the back of a spoon and leaves a clean line when you drag a finger across it. Patience here is what turns a thin, watery base into the velvety sauce every good mac & cheese lunch box depends on.
Step 4: Melt in the Cheese
Remove the pot from the heat before stirring in the shredded cheddar in small handfuls — adding cheese off the heat prevents it from turning grainy. Whisk in the mustard powder, salt, and pepper. Fold the drained macaroni into the sauce until every piece is coated in glossy cheese.
Step 5: Cool Slightly and Pack Smart
Let the mac and cheese rest for 5 minutes to thicken just a touch, which helps it hold its texture inside a lunch box rather than sloshing around. While it rests, fill your thermos with boiling water to preheat the walls, then discard the water right before filling. Spoon the pasta into the warm insulated thermos or a divided bento container, sprinkle the toasted breadcrumbs on top if using, and seal tightly right away. A properly packed mac & cheese lunch box should still be warm and creamy four to five hours later.
Nutritional Information
For a serving of this mac & cheese lunch box (based on 4 servings), the balance of carbohydrates, calcium, and protein makes it a satisfying main dish that holds energy steady through a busy afternoon:
- Calories: 410 kcal
- Total Fat: 18g
- Saturated Fat: 11g
- Cholesterol: 50mg
- Sodium: 480mg
- Total Carbohydrates: 44g
- Dietary Fiber: 2g
- Total Sugars: 5g
- Protein: 17g
- Calcium: 320mg
- Iron: 1.4mg
Healthier Alternatives
Transform your mac & cheese lunch box into a healthier version with these modifications:
- Whole Wheat Pasta: Swap elbow macaroni for a whole wheat or chickpea version to add fiber and protein without changing the texture much.
- Reduced-Fat Cheese Blend: Use a mix of reduced-fat cheddar and a small amount of full-fat sharp cheddar to cut calories while keeping bold flavor.
- Vegetable Boost: Stir in finely diced steamed carrots or a handful of frozen peas for color, fiber, and extra nutrients kids barely notice.
- Dairy-Free Option: Replace butter and milk with plant-based alternatives and a dairy-free cheddar shred for a fully plant-based lunch box.
- Lower-Sodium Path: Use low-sodium broth in place of part of the milk and season with herbs instead of extra salt.
- Whole Grain Topping: Swap breadcrumbs for crushed whole grain crackers to add crunch along with more fiber.
Serving Suggestions
Elevate your mac & cheese lunch box experience with these ideas:
- Pack a small side of cherry tomatoes or cucumber slices for a fresh, crunchy contrast to the creamy pasta.
- Add a few apple slices tossed in lemon juice for a naturally sweet finish that balances the richness.
- Include a tiny container of extra shredded cheese so kids can stir in more melty goodness right before eating.
- Pair with a handful of steamed broccoli florets for a pop of color and added nutrition.
- Toss in a few whole grain crackers on the side for extra crunch without weighing down the main dish.
- Use a wide-mouth thermos so little hands can scoop easily without spilling.
- Rotate in a small side of grapes or orange segments to keep the lunch box feeling fresh and varied throughout the week.
What to Pack Alongside It
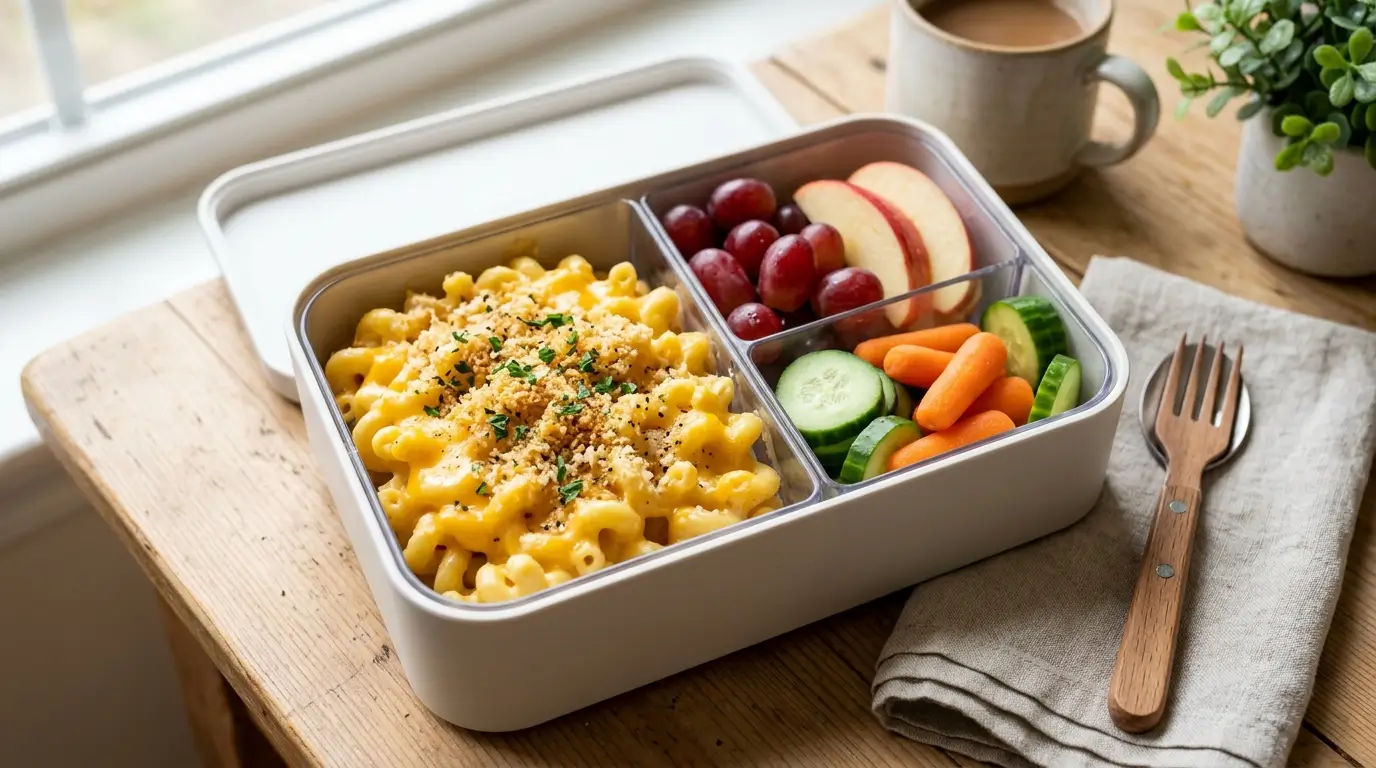
Since most lunch boxes come with multiple dividers, the mac & cheese lunch box works best as the warm main compartment paired with a couple of simple cold sides:
- Fruit compartment: Grapes, apple slices tossed in lemon juice, orange segments, or berries all add natural sweetness and a refreshing contrast to the rich, cheesy pasta.
- Veggie compartment: Cucumber slices, baby carrots, or cooled steamed broccoli add crunch and color without competing with the main dish.
- Crunch or protein compartment: A few whole grain crackers, roasted chickpeas, or a small scoop of diced grilled chicken round things out if you want a more filling lunch box.
- Balance tip: Aim for one fruit, one veggie, and the warm pasta as the anchor — that combination keeps the box colorful, nutritionally balanced, and genuinely appealing to open at lunchtime.
Common Mistakes to Avoid
Master this mac & cheese lunch box by avoiding these pitfalls:
- Skipping the Thermos Preheat: A cold thermos pulls heat away from the food fast. Fill it with boiling water for a few minutes, empty it, then add the pasta.
- Overcooking the Pasta: Fully cooked pasta turns to mush by lunchtime. Always undercook slightly since it keeps softening in the sealed container.
- Adding Cheese Over Direct Heat: Melting cheese while the pot is still on the burner causes a grainy, oily sauce instead of a smooth one.
- Using Pre-Shredded Cheese: Bagged shredded cheese contains anti-caking agents that can make the finished sauce grainy rather than silky and smooth.
- Packing While Too Hot: Sealing a container immediately can trap excess steam, leading to a watery texture by the time lunch rolls around.
- Forgetting the Insulation Test: Not every thermos holds heat equally well, so test yours at home before relying on it for a school-day lunch.
Storing Tips
Preserve the freshness of your mac & cheese lunch box with these strategies:
- Refrigerate Promptly: Store any extra mac and cheese in an airtight container in the fridge for up to 4 days.
- Reheat With a Splash of Milk: A tablespoon of milk stirred in before microwaving restores the creamy consistency that can fade in the fridge.
- Avoid Freezing the Sauce: Cheese sauce tends to separate when frozen, so it’s best to make a fresh batch each week rather than freezing leftovers.
- Prep the Roux Ahead: The cheese sauce base can be made a day in advance and gently reheated before combining with freshly cooked pasta.
- Cool Before Sealing Containers: Let leftovers cool slightly before closing the lid to avoid condensation that waters down the texture.
Conclusion
This mac & cheese lunch box turns a beloved comfort food into a genuinely practical, travel-ready meal. With a silky sauce, smart packing technique, and a preheated thermos, lunchtime stays warm and satisfying. Try it this week and share your results in the comments below.
FAQs
How long does a mac & cheese lunch box stay warm? In a properly preheated, high-quality thermos, it typically stays warm and creamy for 4 to 5 hours, which comfortably covers a standard school or work lunch window.
Can I make a mac & cheese lunch box the night before? Yes, prepare the full recipe, refrigerate it overnight, and reheat gently with a splash of milk in the morning before packing it into a preheated thermos.
What is the best container for packing this recipe? A wide-mouth, food-grade insulated thermos works best because it retains heat well and gives little hands or a spoon easy access to every bite.
Why does my mac and cheese turn watery in the thermos? This usually happens when the pasta was overcooked or the container was sealed while too hot, trapping steam that turns into extra liquid.
Can I add protein to this mac & cheese lunch box? Absolutely, diced grilled chicken or roasted chickpeas both stir in easily and add extra protein without disrupting the creamy texture.
Your Feedback Matters
There are no reviews yet. Be the first one to write one.